This article describes some of the technical background how to record high quality sounds of your performance with video, if you have an electronic piano with a headphone or line-out output. This is just an overview, if you want to learn the topics discussed on this page in detail, click on the links.
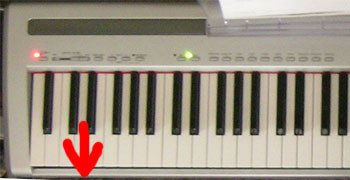
It starts all with the keyboard. On most e-pianos there is a phones (or headphones) output. On my piano (Yamaha P-85) it is on the front, left side:
There are two outputs:

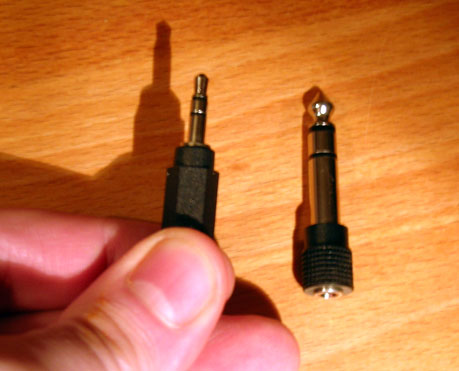
Usually it is a TRS connector of 1/4" (6.3 mm) or 1/8" (3.5 mm) size. There are adapters to convert from the small to the large size and the other way:
Make sure the connector is a stereo connector with three contacts: Left, right and ground. There are adapters for converting from mono to stereo, which would result in hearing the left or right channel, only, when feeding to the soundcard.
The input of the soundcard usually has the same connector in 1/8" (3.5 mm) size. For example, this is the back panel of my Soundblaster X-Fi soundcard:
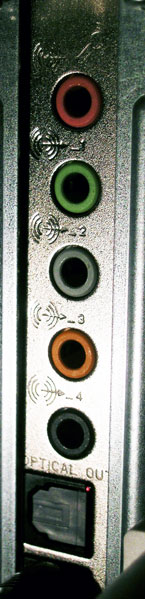
From top to down:
Your soundcard might look different. E.g. there might be two separate inputs: One for microphone and one for line-in. Usually the line-in inputs looks like the line-out outputs in the image, but with the small arrow at the left upper side of the connector pointing in the opposite direction. The manual of your soundcard can help you, too, if there are no icons on the metal.
Now you need a cable to connect the output of your keyboard to the line-in (or combined mic/line-in) input of your soundcard. There are lots of shops at eBay or you can get it at your local hi-fi store or electronic store. Make sure that both sides have stereo connectors.
Sometimes you have RCA connectors (also called cinch connector) at your keyboard or soundcard. Another example is my converter for converting from an analog signal to a digital optical signal:
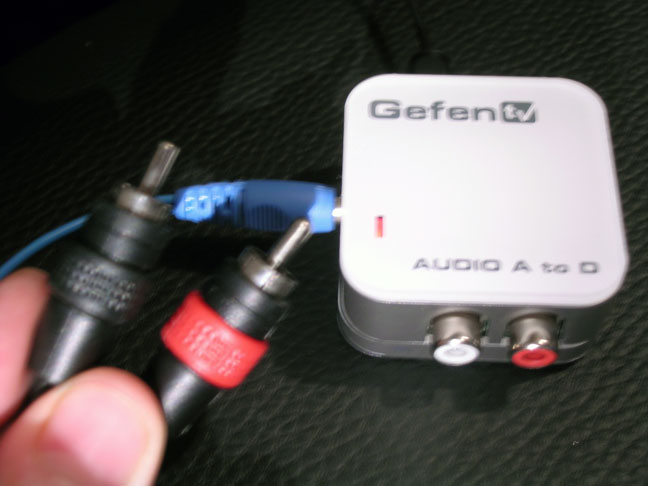
The cinch connector is mono: at the pin is the audio signal and at the cylinder around the ground. So you need two of it for stereo. There are premade cables at many stores which have TRS connector at one side and two cinch connectors at the other sides. I'm using such a cable to connect my keyboard to the optical converter. At the output you can plug a optical fiber cable, which you can plug into your soundcard. This provides the highest possible quality, but the standard analog line-in is really good, too.
But if you use an analog connection, sometimes the sound can hum with 60 Hz (50 Hz for europe, mains hum) or there can be some other noise. This is known as ground loop. If you have this problem, you need an audio isolation transformer, which you can get for some $20 and which usually has cinch connectors, so you'll need two cables with TRS/cinch combination: From your keyboard to the transformer and then from the transformer to your soundcard.
The following is the description for Windows Vista, but should be similar for other operating systems, because the basics concepts are the same.
The first stage is the input setting of your soundcard. First check if the recording device is available. Right click on the speaker symbol at the lower right of the task bar and left click on "recording devices" ("Aufnahmegeräte" in German) :

You'll see a list like this:
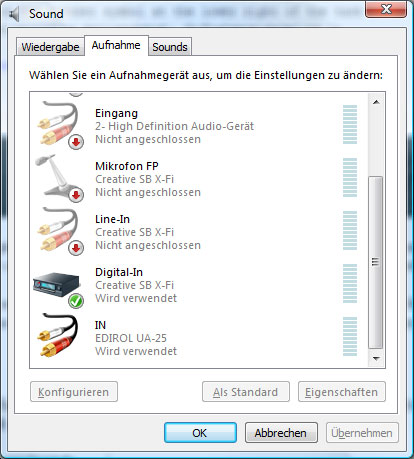
If you see a Line-In input as "connected", anything is ok. You can double click on this device and select the recording level:
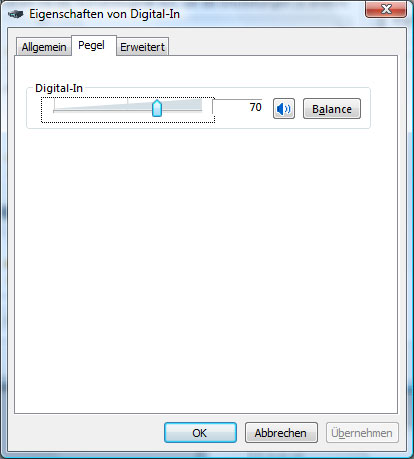
First start with a low recording level, like 70% and use a high level at your volume at your keyboard, because then the signal to noise ratio (SNR) is better, meaning there are less noise when recording.
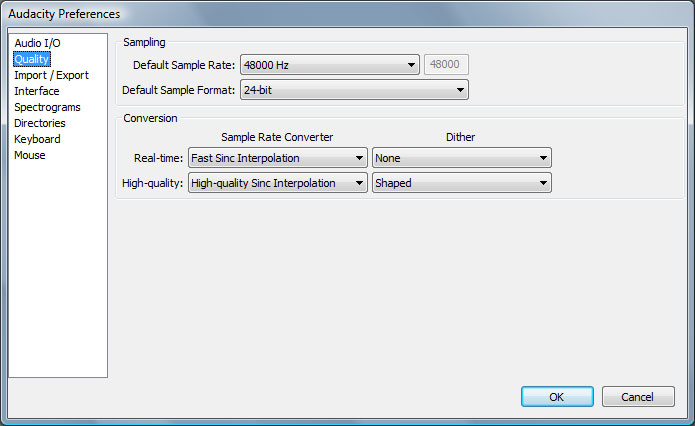
At the last setting for your sound device (called "Erweitert" in German, maybe "Extra" in English?) you can select the quality:
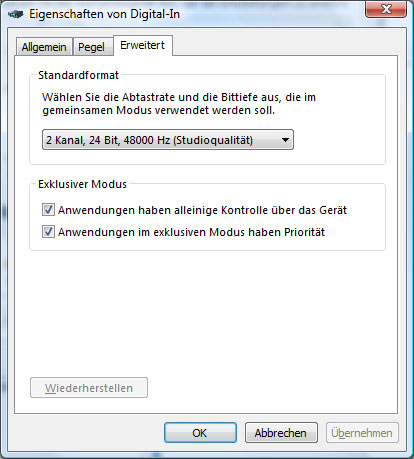
It depends on your device what qualities are available, but you don't need more than 48000 Hz (48 kHz) samplerate and 24 bit resolution, with two channels (stereo).
Special case for soundblaster X-Fi owners (and maybe other soundcards, too) : There is only one TRC input, called "FlexiJack input", which can be used for microphone or for line-in signals. If you have selected the wrong input type, you'll see only the microphone input as connected in the device list and the line-in input is not available. You can record sounds, but they are mono and much noise is added, because of the impedance mismatch. You have to start the program "Creative Konsole Starter" in your Creative program group in the start menu and change the setting to line-in. This is how it looks like in the "Audio Creating Mode":

After changing this setting, you'll see the line-in input in the recording device list.
First I suggest to install Audacity (I'm using the beta version 1.37, which is fairly stable and has more features), which is a nice free audio recording and editing program. After installing, configure it like this: Click in the edit menu on "Preferences". With the Audio I/O panel you can choose your recording and playback device:
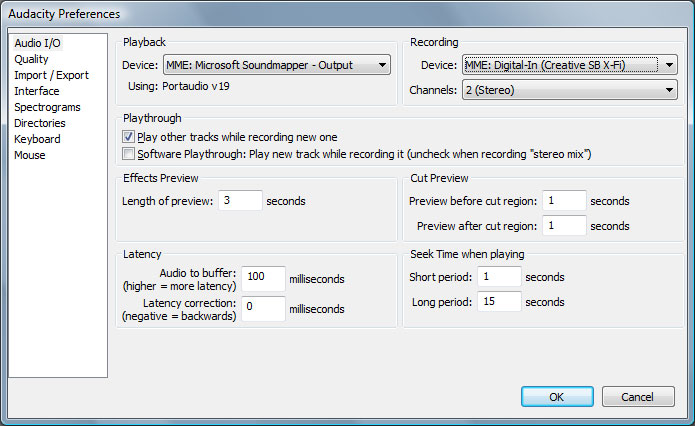
If you check "Software Playthrough", then you'll hear you playing, while it records the audio. This can have some latency and can be distracting when playing the piano, a better way would be to use an Y-cable for your keyboard: The input side in your keyboard, one output side in your computer and the other output in a headphone. Some keyboards allow to configure that it uses the integrated speakers, even if a phones cable is connected, which is better. And finally for some soundcards you can set a routing table to passthrough the input by hardware to the output, which has nearly no latency (this is the way I use it). In general the passthrough solution is a good idea, because then you can use a high output volume of your keyboard, but adjust the output of your soundcard for listening while playing to a lower level.
The next setting is the "Quality" setting. Use the same setting for samplerate and sampleformat you've set for your recording device to avoid loss of quality because of signal conversion:
The preferences are saved, so you have to configure it only once.
Ok, now you can start recording! Start your video camera and hit the recording button and the stop button when you are finished:
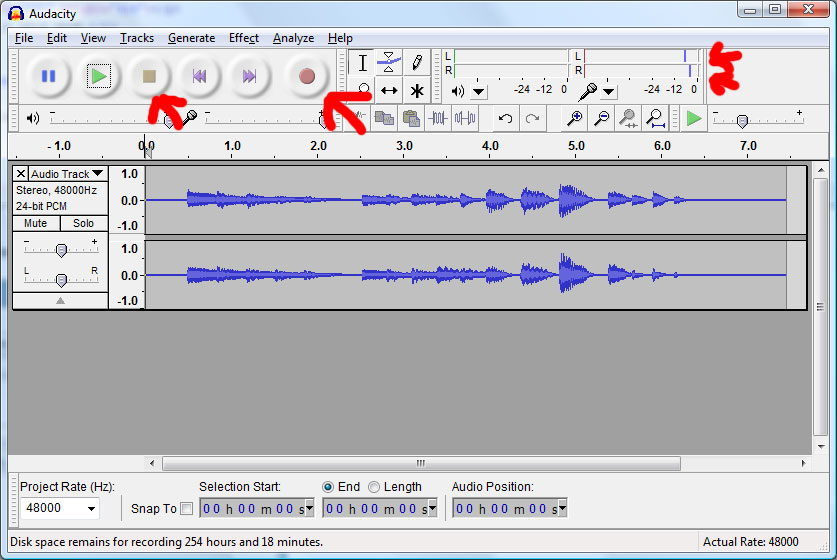
You'll see the waveform of your recording. To avoid clipping, the level should be not too high, but for a better SNR the level should be not too low. A good setting is about -6 dB headroom for the peak detector (you can see it at the top right) or easier: the waveform fills about half of the height for your loudest signal. Adjust the recording level in your operating system or the volume of your keyboard accordingly. Higher keyboard volume is better than higher recording level.
Then save it as WAV format. Use "Export..." in the file menu and select "Other uncompressed files" as the file type:

Then click on "Options" and select "WAV (Microsoft)" and "Signed 24 bit PCM":
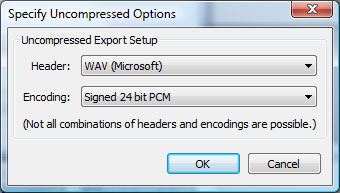
These options are saved, so you don't need to click on "Options" again for your next export. Note: This format works only for Movie Maker 6 (and maybe other good video editing programs). If you have Movie Maker 2.1 or Movie Maker 2.6, then choose "WAV (Microsoft) signed 16 bit PCM" as the file type, otherwise there are problems when importing it later in the video editing program.
Finally start Movie Maker. Important note: Looks like there are problems with the audio quality, if you don't have Movie Maker 6 (which is included in Windows Vista), but Movie Maker 2.1 or Movie Maker 2.6, which is included in Windows XP. In this case, and if you don't like Movie Maker, you can try Pinnacle VideoSpin, see next chapter.
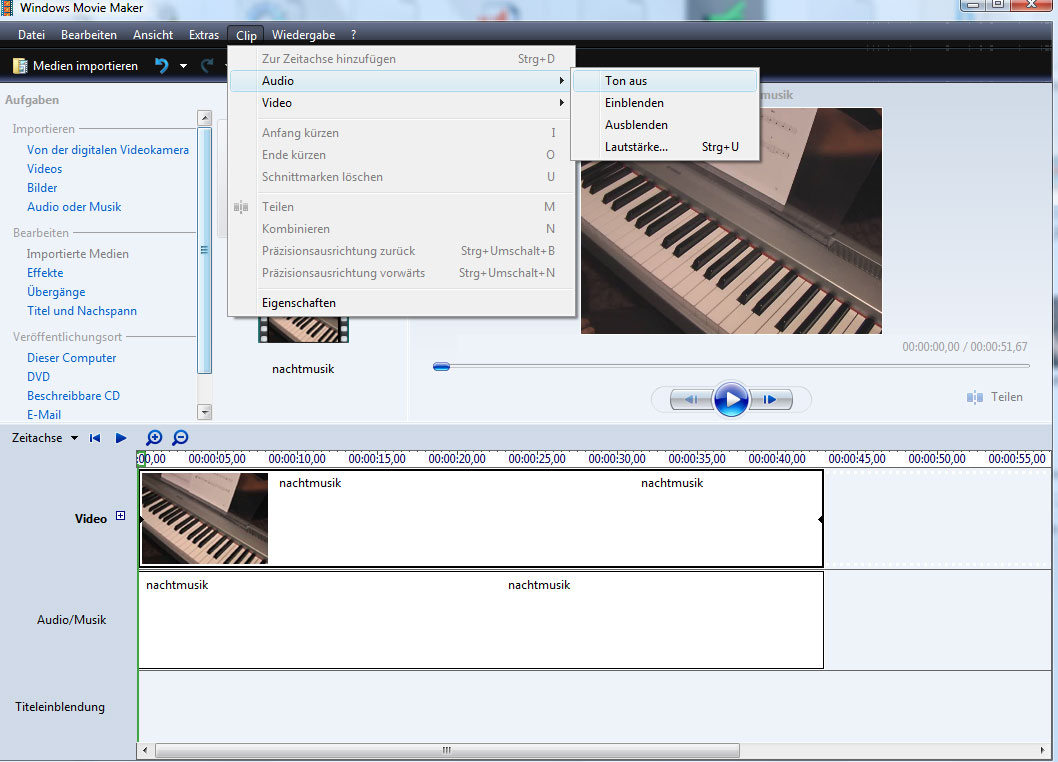
Import the WAV file and your video from your camera, then drag the WAV and the video files to the timeline. Then disable the audio for your clip in the Clip->Audio menu:
You can move the audio track and clip the start and end with the mouse, to synchronize it with the video. Use the zoom buttons for higher positioning precision. Finally you can publish your video, which is a fancy name for creating a WMV file from the timeline, and then you can e.g. upload it to YouTube. Make sure to select for "local computer" and "maximum quality for playback on local computer" when publishing with Movie Maker for the highest quality.
First install the program. You can download the program for free from http://www.videospin.com
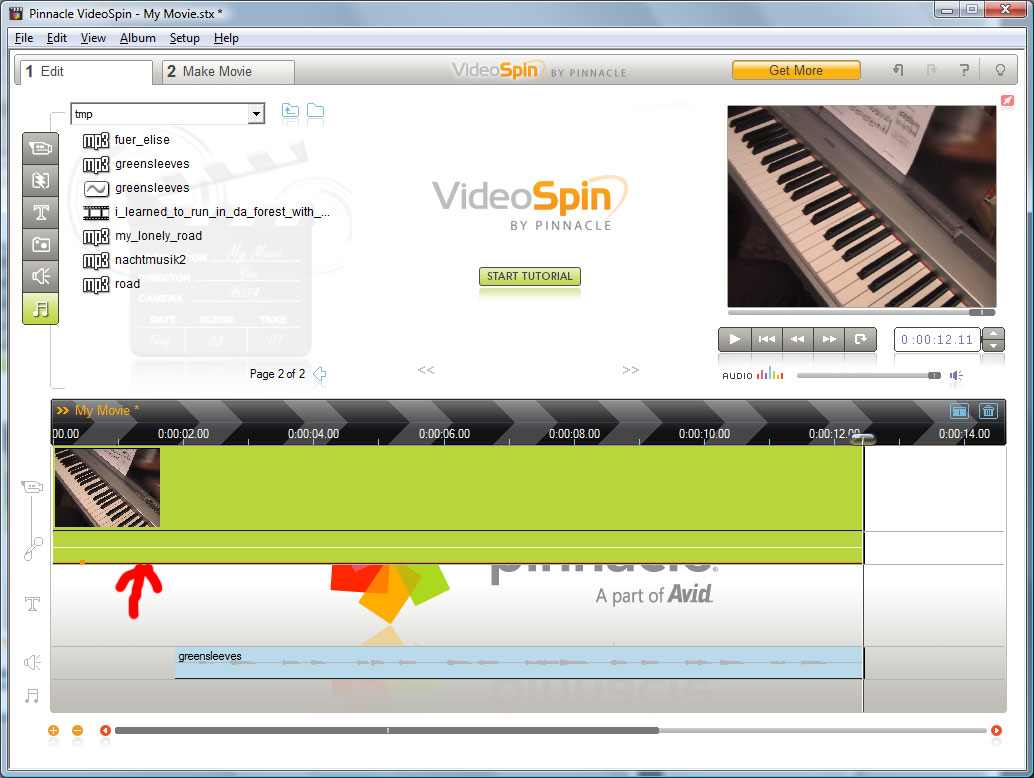
After starting, you can drag and drop the WAV file and the video file to the timeline (note: looks like the 24 bit WAV file format doesn't work, so export it as 16 bit in Audacity). Then you can drag down the orange line of the video with the mouse (see red arrow), which is the audio track for the video and turns off the audio of the imported video from your camera. After this you can zoom in the video for higher precision for synchronizing the imported WAV audio track to the video. Just drag the mouse on the time numbers. Then drag the audio track to the right position:
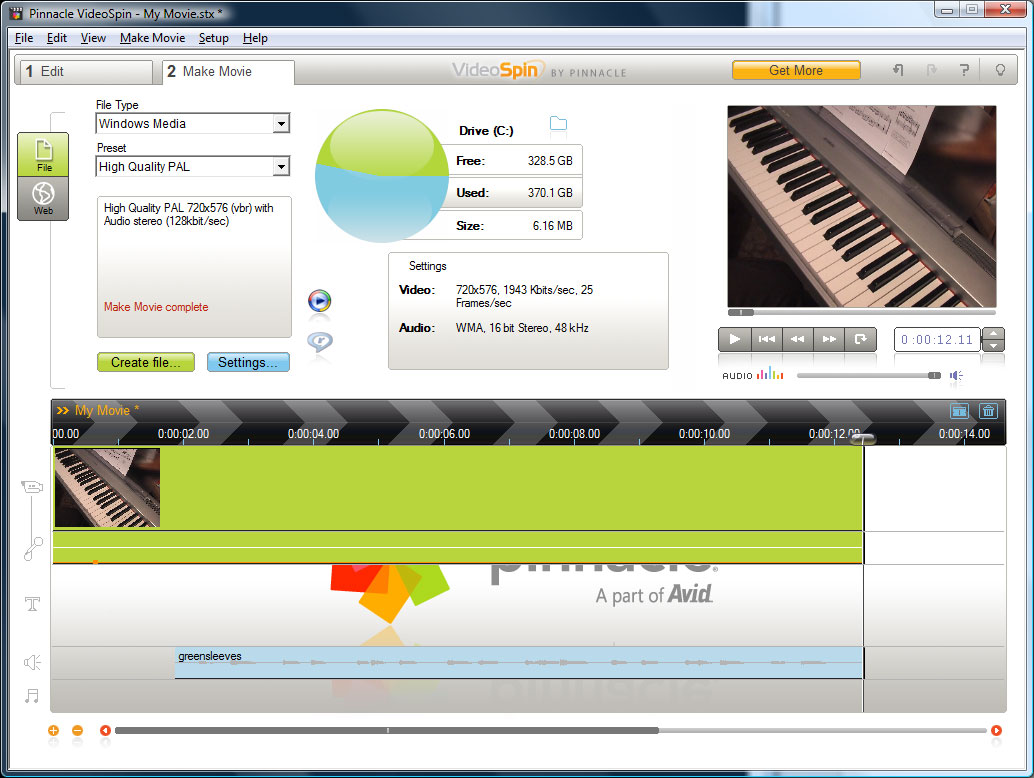
Finally click on Make Movie and choose Windows Media, which a High Quality setting (size depends on your video format from your video recording device) and click on create file:
The final result looks like this:
